All shipping $15 Australia wide (excludes bulky items). International orders not accepted.
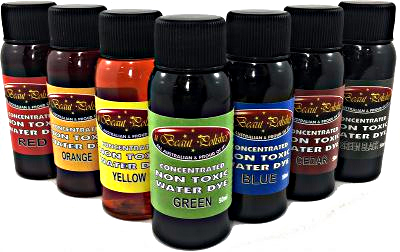
U Beaut Non Toxic Water Dyes Pack of 7 colors
U Beaut Non Toxic Water Dyes Pack of 7 colors
Because the dyes are concentrated they can be diluted up to 10 times their volume in water and still have extremely strong dying capabilities. It is also possible to obtain very subtle pastel shades by adding full strength dye to 100 or even 1,000 times its volume of water.
The dyes are all made from colourings approved for use in kindergartens and foodstuffs and are therefore NON-TOXIC making them safe for use on bowls, food utensils, children’s toys, babies rattles, etc.
PREPARATION
Before you use Water Dye it is advisable to put in some fine preparation work with abrasive paper. On most work it is best to use the following grit papers. 180, 240, 320 & 400. On pens and small objects that will be under close scrutiny or continually handled etc. use 600, 800 & 1200 grit also.
WETTING DOWN
Water Dye will raise the grain of some timbers, especially if used hot, so it is imperative to wet down the timber prior to dying.
Moisten a clean rag or sponge in warm water, gently squeeze out excess so as the rag is not dripping wet. Apply an even wet coat of the warm water to the surface that is to be stained. Wring out the cloth thoroughly and
remove any excess moisture from the timber. Allow the timber to dry. If you wish to speed up the process you can apply heat from a hair dryer to the surface. DO NOT use a heat gun designed for paint stripping.
When the timber is dry, lightly sand the surface with your finest abrasive to remove the raised grain (if any) You MUST use 400 grit or finer for this final sanding or you may tear the grain and have to wet down a second time. If you are working on a flat surface you must only sand with the grain.
APPLYING THE DYE
You are now ready to apply the dye to your work.. There are three main methods of applying the dye. Small objects can also be dipped or boiled . Experiment for yourself.
1/ Brush on: Use a clean paint brush and apply an even wet coat to the entire surface. Allow a couple of minutes for the dye to penetrate the timber’s surface then wipe off excess with a clean dry rag.
2/ Use a rag: This is best used for woodturners as the rag tends to absorb too much of the dye when used on large areas. Use a small piece of rag moistened with the dye and apply an even coat to the timber with the lathe stopped. On some timbers you may find it an advantage to apply the dye with the lathe running, in this case beware not to apply the dye too wet or you may have a lot of new freckles on your arms and face.
3/ Spray: Water Dye can be sprayed using high pressure, low pressure or airless spray equipment. Apply an even coat to the surface, allow a few minutes for surface penetration then wipe off excess. (avoid runs on the surface)
If during the application of the dye the surface of the timber is raised again, it is now possible to flatten it with a light sanding using your finest abrasive, this should not effect the colour because it is in the wood not on the wood. (make sure the timber is dry before sanding)
APPLYING A FINISH
Once the dye has dried you can apply the desired finish to the surface in the usual fashion or as per manufacturers instructions.
If using Shellawax, a wax stick or a paste wax finish applied by rag you may find some of the dye colour on the face of the rag. This is nothing to be alarmed about, it is not the dye pulling off the timber, it is simply some of the colouring pigment that did not penetrate the surface of the wood. Remember that the colour is in the wood not on the surface.
HINTS ON USE
For deeper penetration: apply the dye hot. As it is non flammable the dye can safely be heated on a stove or microwave, etc.
Applying hot will allow for quicker and deeper penetration into the timber’s surface, however it may also raise the grain dramatically if proper wetting down has not been done prior to the application of dye.
Density of colour: It is advisable to weaken the dye with water prior to applying. How much water you use will depend on how dense you wish the finished colour to be.
Mix a small portion of dye with 4 parts water and try it on a scrap piece of wood for colour and intensity this can be diluted further if required. Each coat of dye you apply will darken the finished colour, so it is better to start with a weak mix and give a few applications rather than apply one dark coat.
Water Dye can be used in both PVA & Hide glue gesso to create startling decorative effects but be prepared for unexpected colour changes when used to colour hide glue.
Approximate colours on white woods![]()
By mixing and matching the colours you can create almost any colour under the sun. If you put a drop of red in with the black you can create a jet black, a spot of green in with the cedar will create a walnut brown. The possibilities are endless…..
LOOK: These dyes are specially for use under Shellawax, Shellawax Cream, Aussie Oil and Glow but can be used under most other non water-based surface coatings including: Danish oil, polyurethane, nitrocellulose lacquer, varnish, shellac, etc.
CAREFUL: Before using these dyes under water based polyurethane or any other water based finish it would be wise to try a test piece. It is possible that the dye might bleed out into the finish. If you find the colour bleeds it can be sealed in with a thin coat of white shellac prior to the application of a water based finish polyurethane
WARNING
These dyes will stain hands and clothing. Wear rubber gloves and protective outer clothing or take care. Rinse stained clothing in cold running water. When machine washing stained garments, wash separately or you may stain other cloths. Hands can be cleaned by scrubbing in hot soapy water however some dried stains can be very hard to remove & may be visible for a day or so